One of the most common operations when authoring materials is blending together different textures using a mask. It’s a great way to create new textures by combining existing ones, or to have more options for adding variation during rendering.

But very often when you use a soft mask, this is what you get:
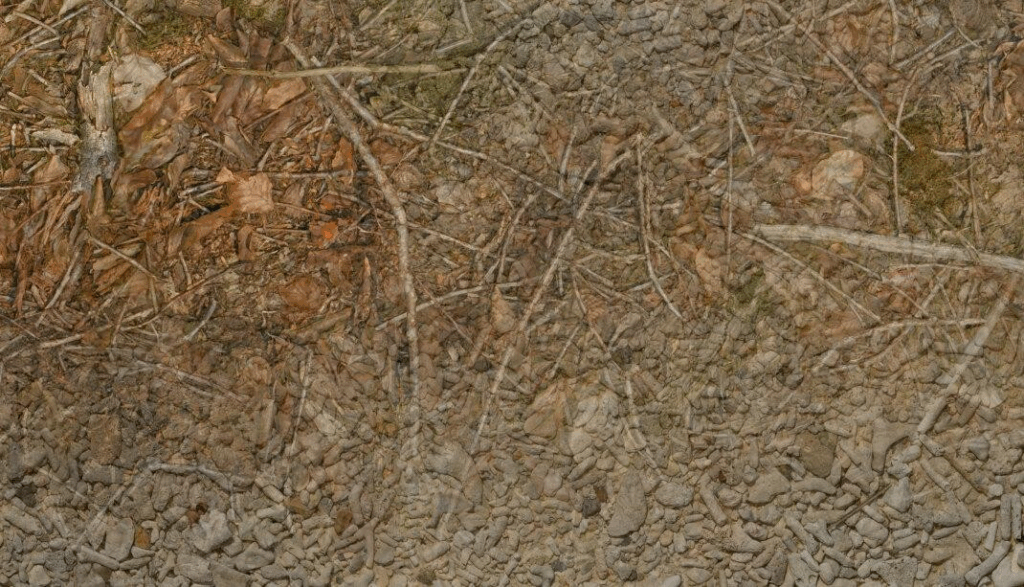
Both textures, the forest ground texture and the pebbles texture, are simply layered on top of each other, and details such as sticks and pebbles are noticeably transparent. Also, in the areas where the textures are displayed with reduced opacity, the effective contrast of the resulting texture is noticeably lower than in the areas where only one texture is displayed.
There are several ways to fix/improve this situation:
- Using height-blending, you can create a mask that is affected by the heights of the details. This allows you to use a higher mask contrast without creating a noticeable edge.
- You can increase the contrast of the result in the blended regions based on the opacity of the source textures to maintain an even contrast throughout the texture.
Neither solution is perfect. Increasing the contrast in the blended areas doesn’t fix ghosting. And height blending is only an option when height maps are available, which isn’t always the case. And even then, its usefulness depends on fine-grained, noisy height maps, and on all contrasty details actually being present in the height map. So if a material has a lot of details in the base color that aren’t present in the height map, height blending won’t help preserve them during blending.
Another approach to this problem was recently proposed by Bart Wronski, research scientist at Nvidia. It got published here in the Journal of Computer Graphics Techniques.
I highly recommend reading it because it has two very strong qualities: It’s a) very clever and b) relatively simple once you understand how it works.
The technique is called Laplacian texture blending, because it uses a Laplacian pyramid.
I won’t describe the technique in detail (that’s what the paper is for), but the basic idea is that instead of blending the two textures with one mask, the textures are split into several frequency bands. These frequency bands are then blended together using separate masks. The high frequency bands are blended with a high frequency mask, while the low frequency bands are blended with low frequency (read: blurred) versions of the mask. This way, the contrast of the small details in the textures is preserved, while the low-frequency elements, such as the dominant colors, are blended very softly.
Let’s see what the result looks like:
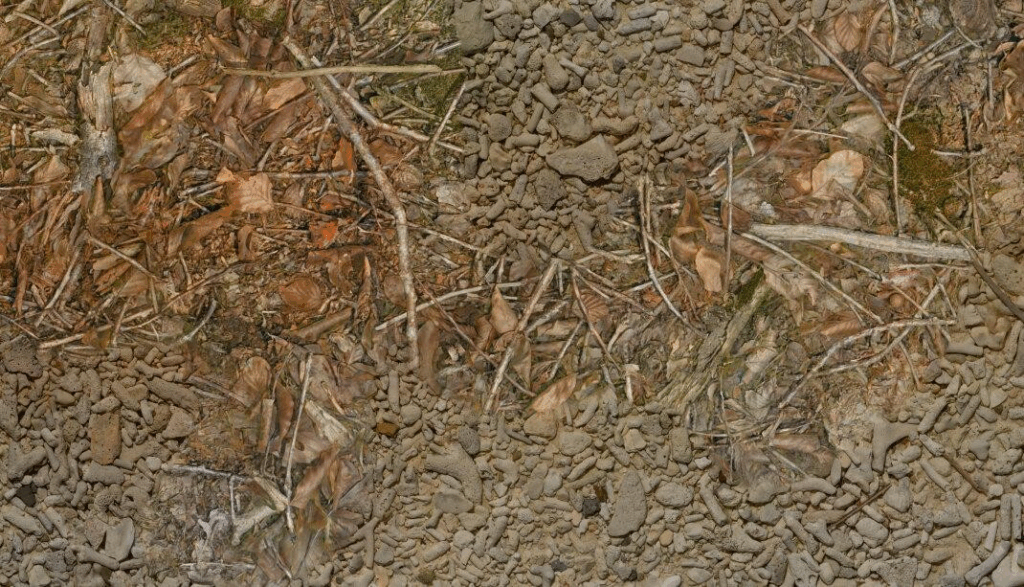
Compared to the classic blend, ghosting is dramatically reduced. Details remain intact and distinct, and local contrast remains consistent throughout the texture.
When I read the paper, I immediately wanted to try and implement the technique myself, and that’s how this blog post came about.
It’s basically a documentation of my implementation of this technique in Substance Designer, but written as a tutorial so that you can easily implement it yourself and hopefully avoid some of the problems I encountered.
A few notes first:
- I’m using Substance Designer 5 for this tutorial. That’s because I’m old and grumpy and still remember the days when Allegorithmic was not owned by Adobe and offered perpetual licenses for their products instead of forcing you to subscribe to them. The tutorial is still valid for newer versions, but in one or two places, newer versions may offer more elegant solutions to some problems.
- This tutorial explains how to implement the technique with a fixed number of mip levels. If you’re actually going to use this in production, I would recommend letting the user control the number of levels so they can control how soft they want the blend to be.
- Since the tutorial only covers how to implement the technique in Substance Designer, I highly recommend reading Wronski’s paper to understand how the technique works before starting the tutorial, as I won’t go into the details.
Step 1 – Separating the Frequency Bands
The first step is to separate the frequency bands present in the mip maps of the input textures. Due to the smaller resolution, each mip map in the chain loses the highest frequencies, as there are not enough pixels anymore to display them. Therefore, you can isolate these frequencies by subtracting the smaller mip map from the bigger one:
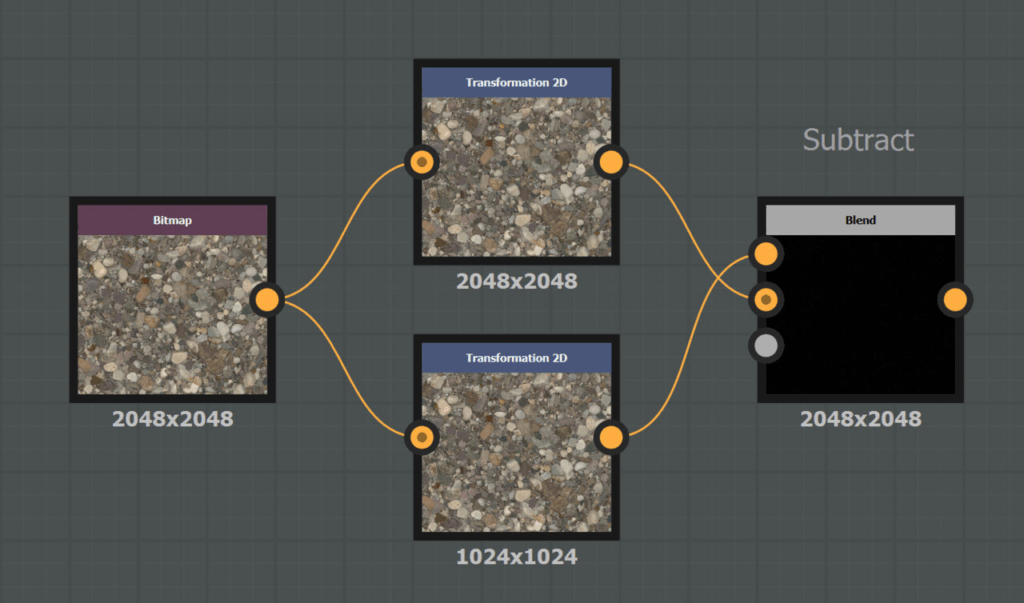
There’s a problem with this, though: Since the differences between the mip maps can be both positive and negative, the Subtract node removes about half of them because the output is clamped to the 0-1 range.
Note: Newer versions of Substance Designer apparently offer the option to have nodes that work in an HDR range outside of 0-1. I haven’t been able to verify this, but it’s something to consider, as it will make your life easier.
To avoid going outside the 0-1 range, you need to offset the values in the two inputs so that the output isn’t centered around 0.0, but around 0.5, similar to how normals are stored in normal maps. To avoid losing any information due to the offset, the range of the input texture has to be reduced as well. This is what the resulting graph looks like:
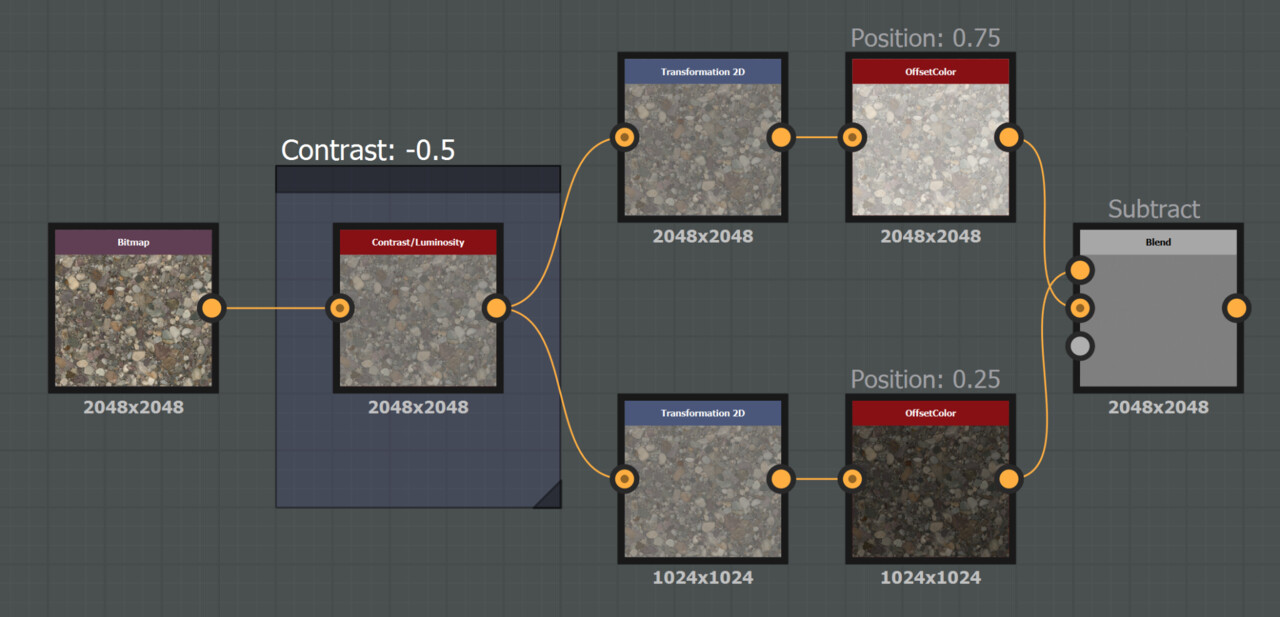
The OffsetColor Node
The OffsetColor node in the screenshot above is a custom node because Substance Designer doesn’t provide one by default. It simply combines three Histogram Shift nodes:
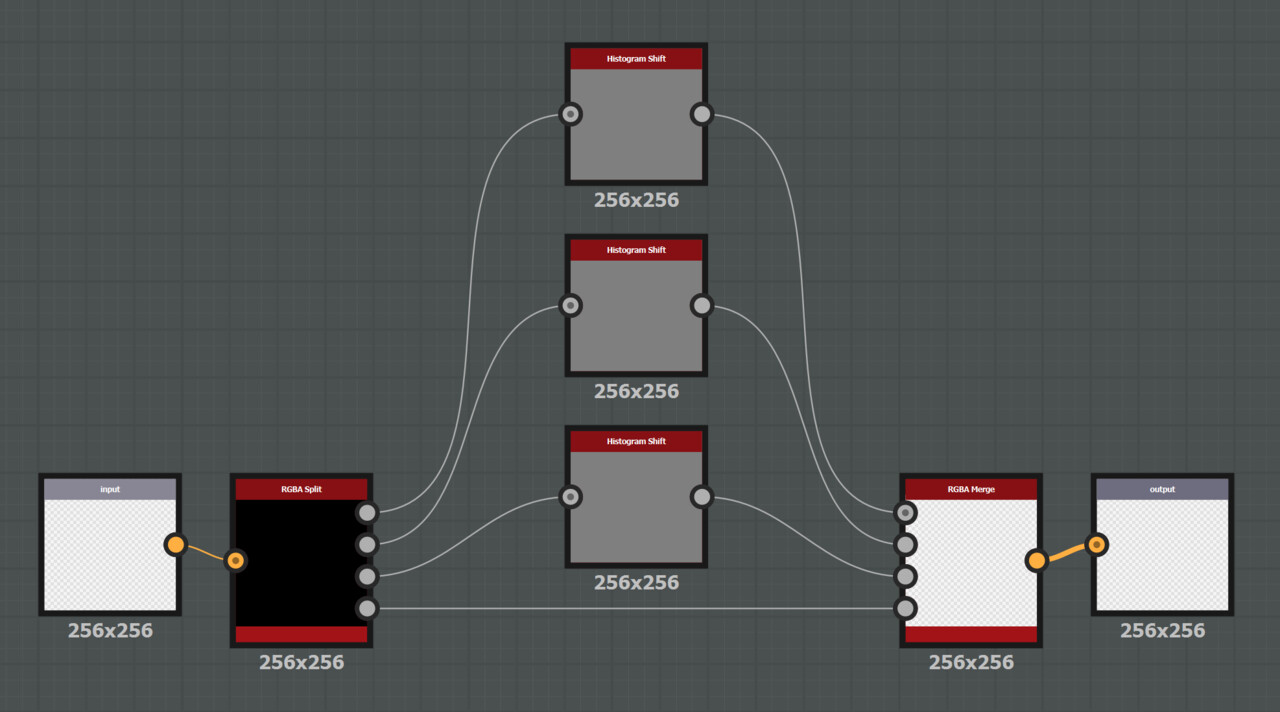
Their Position parameters are all mapped to the same shared Input Parameter.
Once this setup works, it’s time for some copy and paste:

In this graph, the previously used Bitmap node is now replaced by an Input Color node. Each frequency band is connected to a separate Output node. Note that I’m referring to them as Levels in the comments, because that’s the name used in the paper, but in the context of the tutorial, I prefer the more descriptive term frequency band.
Finally, the smallest mip map, called the Gaussian Level here, is output without any modifications. It contains all the lower frequencies not present in the diffs above.
It’s up to you how many levels you want to use, depending on how smooth you want the transition to be. Each step makes the blend softer. The paper uses 4 levels as an example, but for my test scenario, 4 was not soft enough. As the number of needed levels depends heavily on the dominant frequencies of both the textures and the mask, I recommend to expose the number of levels as a parameter. Ideally, it could even be a float parameter that mixes the results of the versions with the number of levels rounded up and down.
Step 2 – Blending the Frequencies separately
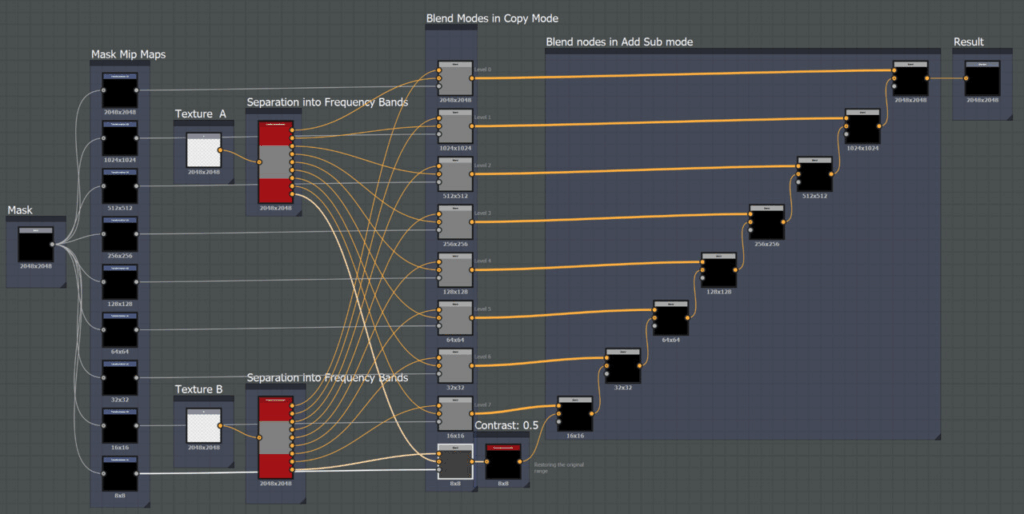
Now that you have separated the frequency bands, blend them separately. Start with the Gaussian Levels and blend them using the appropriately mip-mapped mask. The frequency bands are blended in the same way. For each blend, the appropriate mask mip map has to be used. The one with the highest frequencies uses the full resolution mask, the next uses the half resolution mask, and so on.
Then all the blended frequency bands are added to the blended Gaussian Levels. Luckily, Substance Designer offers an AddSub blend mode that subtracts (0.5 – foreground value) for foreground values below 0.5 and adds (foreground value – 0.5) for foreground values above 0.5, so there’s no need to do any additional math to get rid of the offset added earlier.
Notice in the screenshot how each AddSub blend node increases the resolution. Since the background input is the one used as the reference when the node’s size setting is set to Relative to Input, each blend node needs a +1 offset to the input resolution, otherwise the size of the Gauss levels would be propagated to the top.
And that’s it, you’re done. The finished graph can now be used just like a classic blend mode:
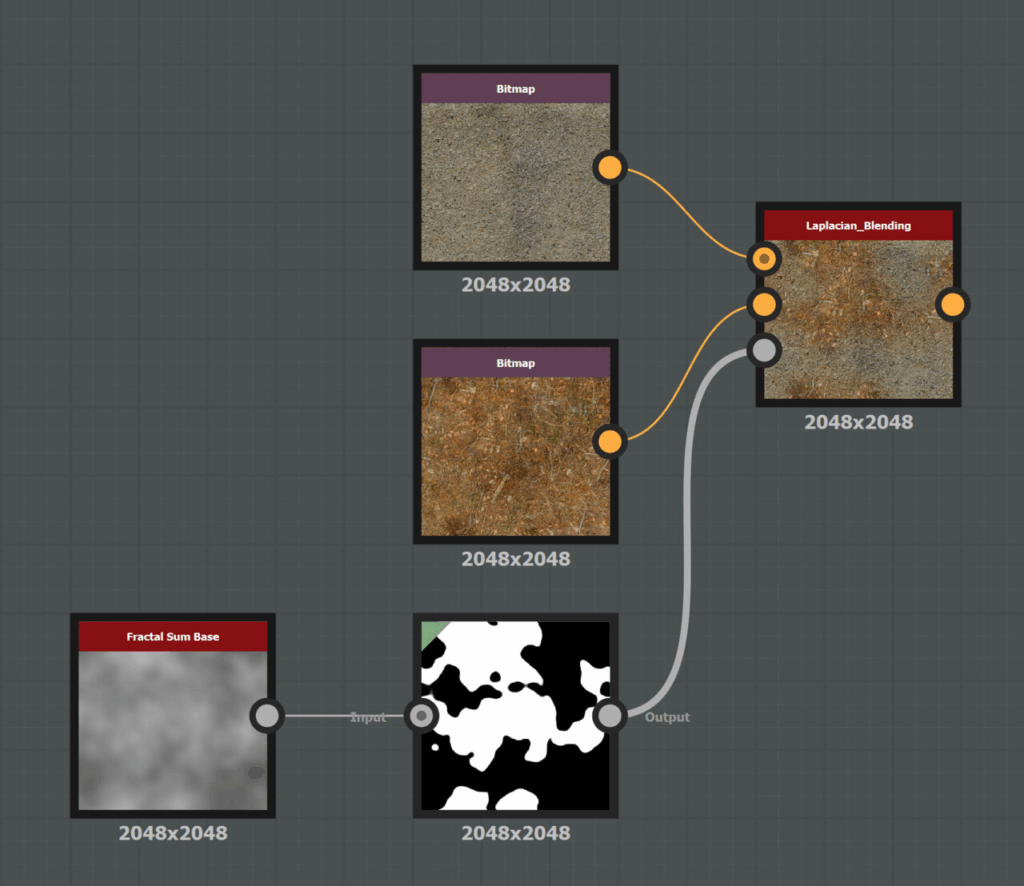
A word of advice before testing: Since the mask is only blurred, not sharpened, the contrast of the original mask will dictate the highest possible contrast in the blended result. I’d recommend using masks that are either completely binary or close to it. Ideally, you have matching height maps for your textures and compare these two to modify the mask: While Laplacian blending can be used as an alternative to height blending, it can also be used to enhance it.
Performance
Since creating textures in Substance Designer doesn’t need to be done in real time, performance wasn’t a high priority for this implementation. I didn’t look into performance improvements like skipping layers, and 7 layers would probably be a bit heavy if used in a real-time context. If you’re using this implementation multiple times in an already complex material, you might want to check the computation time anyway, and I’m sure I’ve left some optimization potential on the table.