
A while back, I watched this talk about performance optimizations in Gears 5, and I was intrigued by their process for detecting objects that don’t cast visible shadows.
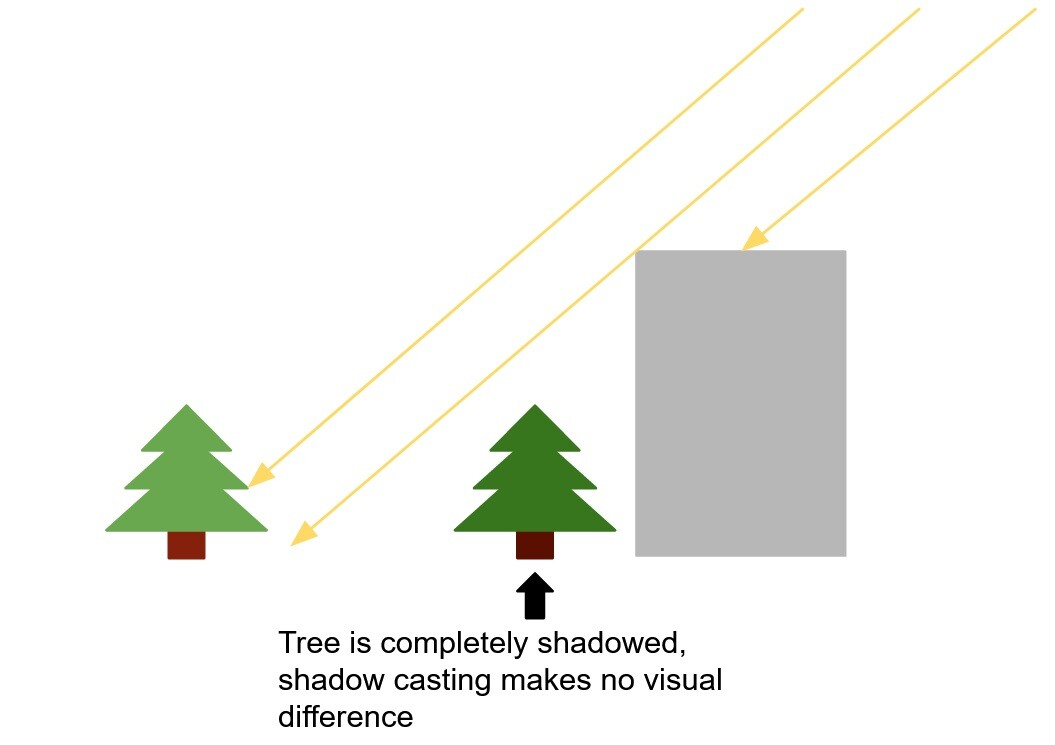
Basically, in outdoor scenes, you usually only have one relevant light source, the sun:

Any mesh that doesn’t have a clear line of sight to the sun is in the shadow. No light will reach it, so shadow casting will have no visual impact. Therefore, shadow casting can be disabled for this mesh.
Theoretically, you could avoid rendering the shadow for this mesh by adding occlusion culling to the shadow rendering, but in most cases this would probably actually worsen performance, since it’s expensive to do this at runtime, and as long as the environment is static (which is the case for many games), it’s also not necessary, we can just do it once in the editor.
So, I decided to implement this optimization using blueprints. My method is a bit simpler than the method mentioned in the video linked above and is therefore more conservative, but depending on the level content, it can still improve performance noticeably. And since it worked so well for me, I decided to write this tutorial for other people who are struggling with the performance cost of shadow rendering (and who isn’t?).
Use Cases
If you want to add this implementation to your own game, make sure you’ll benefit from it. There are some conditions that your content should meet:
- If you have a day-night cycle in your game, this optimization won’t work. You could adjust the blueprint to check if an object is lit by the sun for every sun position throughout the day, but the number of objects that are never reached by the sun is probably quite small.
- For baked lights, this optimization doesn’t apply. Disabling shadows on objects used for light baking reduces the baking time but doesn’t improve the performance of the game at runtime. Instead, it degrades the quality of the indirect lighting.
- If parts of your level geometry are destructible or can move during gameplay, you will need to adjust the blueprint to ignore moveable/destructible objects. If your level is almost entirely destructible, the savings you get from this method may not be worth the effort.
- If other light sources can be added at runtime (maybe the player can equip a flashlight), some meshes won’t cast shadows when lit by them. I imagine it might be possible to split the ‘Cast Shadow’ setting into two, one for directional lights and one for all other light types, but that’s another topic for another day.
While the implementation is mostly blueprint-based, I also made a small engine change to make the tool easier to use. It’s not strictly necessary for the blueprint to work, though, so you can skip this part if you’re using a precompiled version of the engine.
How it works
To check if an object casts a shadow, the blueprint iterates over all shadow-casting static mesh components in the level. For each mesh, it does 8 line traces towards the sun, using the corners of the bounding box as starting points. If at least one of the traces doesn’t hit a shadow-casting mesh, the mesh is lit by the sun and must cast a shadow. Since the bounding box is used instead of the actual mesh, there will be some false positives, so some objects will be considered lit when they aren’t. Theoretically, there could also be cases where all traces hit shadow-casting geometry while the center of the object is still lit, but so far, this situation hasn’t come up in any of the levels I’ve used for testing.

Creating the Blueprint
1. Create an Editor Utility Blueprint and select EditorUtilityActor as parent class. This way you can be sure that the actor won’t be included in your packaged game. Place the actor in a level that contains some static meshes and a sun to test it on.
2. In the blueprint you need to create 6 functions. The first one is called ‘Disable Obsolete Shadows’:

This function is called in the construction script and uses the other functions to perform all the necessary steps. First, it gets the sun’s light vector using the ‘Get Light Vector’ function. Then it iterates over all the actors in the level, gets the static mesh components and calls ‘Set Shadow Based on Light Vector’ on them. The cast to the Instanced Foliage Actor makes sure we don’t perform these steps on foliage, since we can’t control shadow on individual instances.
Note: As you can see in the screenshot, the light vector is stored in a local variable. All variables in this blueprint are local, which makes it much easier to keep track of which variable has which value at any point in the graph.
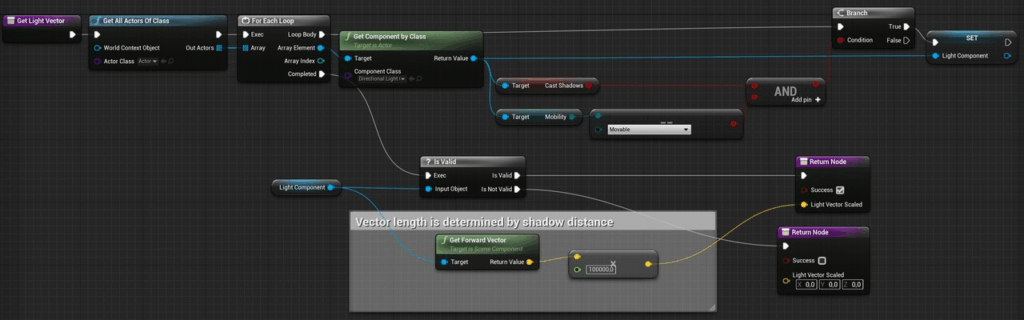
3. The ‘Get Light Vector’ function is quite simple. It finds all directional light source components in the level, and if a component is both shadow-casting and dynamic, it returns its forward vector (The light direction) multiplied by 100000 (which is just a very high magic number).
4. ‘Set Shadow Based on Light Vector’ checks for each static mesh component if it’s lit by the sun and sets the shadow accordingly:
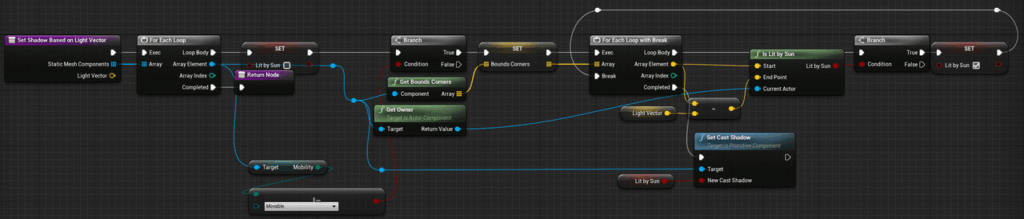
If a mesh component passes the checks, the shadow casters are searched for for each vertex of the bounding box.
If a ray doesn’t hit a shadow-casting mesh, the loop is broken and the shadow is enabled.
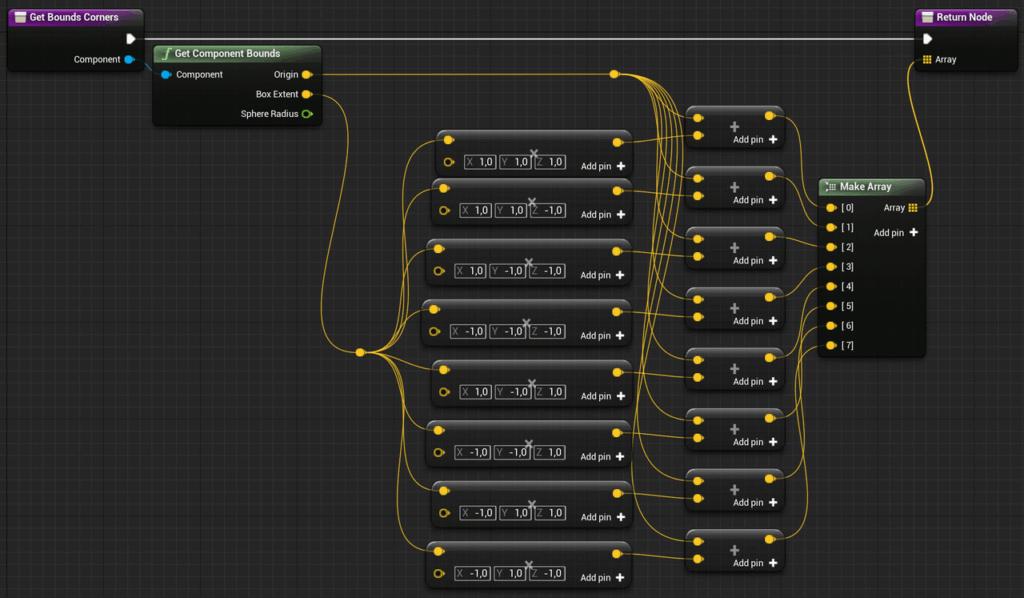
5. ‘Get Bounds Corners’ is used to get the starting points for the line traces. This is not the most exciting or elegant function:
6. The ‘Is Lit By Sun’ function does the actual line traces. Yes, plural, because one isn’t always enough. The line trace can also hit blocking volumes or meshes that aren’t casting shadows. In this case, we need to do a new line trace, starting at the hit position and excluding the hit actor. This loop is repeated until we reach the end of the line trace or find a shadow-casting mesh.
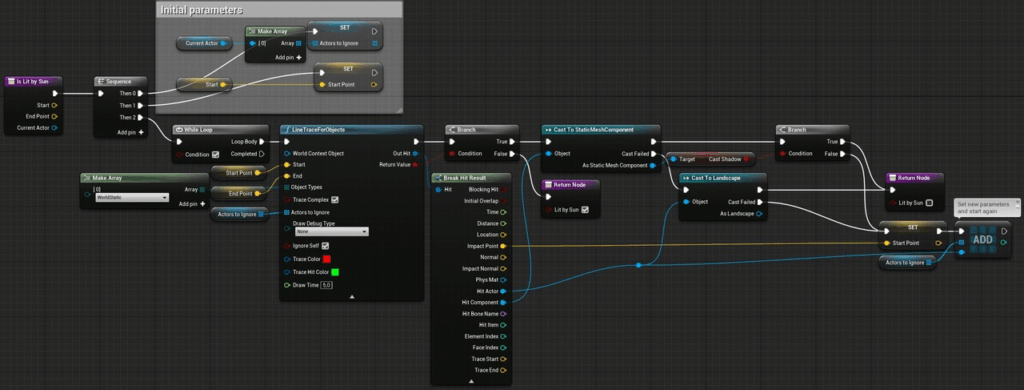
Each time a hit is detected, the component is cast to a static mesh component, and if the cast is successful, the ‘cast shadow’ setting of that component is checked. If a shadow is cast, ‘Lit By Sun’ is false – at least for this line trace. If the hit component is not a static mesh, the hit actor is cast to a landscape. Technically, the blueprint should also check whether the landscape casts shadows, but for my personal project I’m assuming that all landscapes cast shadows, so I skip this step.
7. That’s it! After compiling the blueprint and placing it in a level, you’re done. There are a few steps to refine it:
At least for initial testing, you may want to add some logic to the blueprint to count the number of meshes on which shadows get disabled by this logic, to see if the optimization works as intended and saves some draw calls. You can also use the options in the line trace node to draw some debug lines.
Depending on your projects, you may also want to extend the blueprint to also consider spline meshes or even skeletal meshes if you’re using skeletal meshes for your environments. You can also extend it to include spotlights or point lights.
The Engine Change
As mentioned earlier, I slightly modified the engine to have a setting for each static mesh component to disable this automatic system. This change is fairly trivial if you’re familiar with C++. If you’re not, the biggest hurdle is downloading the engine’s source code and successfully compiling it. There are plenty of resources for this on the web, so I won’t cover it here. Once you have your engine built, all you need to do is open
…\Engine\Source\Runtime\Engine\Classes\Components\StaticMeshComponent.h
In the class body of UStaticMeshComponent, add the marked lines:
The comment in the first line seems trivial, but Unreal uses these comments to generate tooltips in the editor, so don’t skip it. Then the UPROPERTY macro is called. This macro makes sure that the variable declared in the next line can be used in the editor.
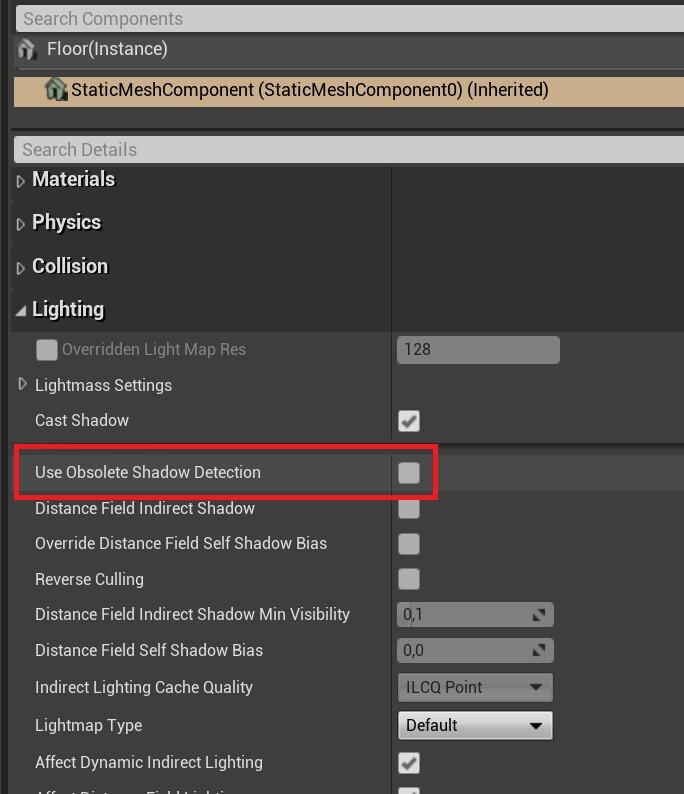
After compiling and starting the editor, the new setting appears in the static mesh component details:
The Results
In order to have a representative comparison with a level that isn’t built in a way that exaggerates the effectiveness of this optimization, I used KK Design’s Modular Ruins Kit, available on the Unreal Marketplace. The example level contains several cliffs and ruins that cast shadows on several clutter items on the ground, so there should be some shadows that can be disabled by this system.
These are the results after placing the blueprint in the level:
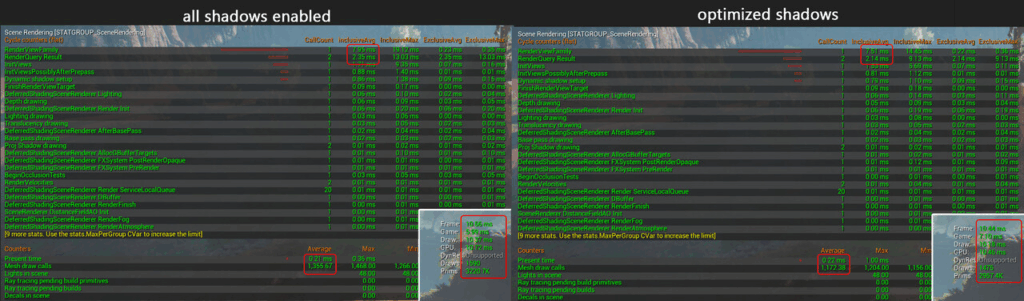
While the performance difference isn’t huge, the optimization saves 0.2-0.3ms on both CPU and GPU. Note that there is no visual difference, and since the system is fully automatic, there are no adjustments necessary later on when the content changes or new levels are added. Depending on your game, you’ll likely see consistent performance improvements throughout your outdoor levels.
Known Issues
When using contact shadows, there are some cases where this optimization can make a visual difference. Contact shadows aren’t limited by the shadow draw distance used for the CSM shadows, so for smaller objects, they are helpful to still draw at least some shadows in the distance. Contact shadows aren’t rendered for non-shadow-casting meshes in 4.26+, so disabling shadows removes these shadows as well.
So if an object is far away from the camera, it’s not covered by the CSM shadows due to the restricted draw distance. As a result, the contact shadows missing now make an actual difference. This isn’t a real problem in the levels I’ve used this technique in so far, but it’s something to be aware of.
If you enjoyed this article or found it useful, please share it with others! If you have any comments, questions, or feedback, please post them below. To get informed about new articles, follow me on Artstation, on Mastodon or Bluesky.