
Especially if you happen to use a slow Internet connection, you may have noticed that modern games are larger in file size than ever before. And if you happen to be a game developer, this is something you need to be aware of, as it can discourage people from downloading and playing your game, either because they’re not willing to wait for your game to download, or because they simply don’t have enough free space on their hard drive.
There are many ways to reduce the size of your game, and one technique that is effective and surprisingly simple is mip flooding, which allows textures to be compressed more effectively. In this article, I’ll explain how it can help you keep your game small and how to implement it in Substance Designer.
What is Mip Flooding?
Mip flooding was first used in the 2018 God of War reboot and was showcased at GDC 2019.
The technique adjusts textures so that they can be compressed more effectively. The less detailed a texture is, the smaller it can be after compression. With UV-mapped textures, there are always pixels that are not actually part of a UV shell, so replacing them with a flat color can significantly reduce the size of the compressed texture. To do this, simply create a mask based on your UV layout and use it to replace pixels outside the mask with the flat color.
Unfortunately, since textures are usually mip-mapped, this will lead to visual errors, as the flat color will bleed into the UV shells in smaller mips.
Mip flooding solves this problem: Instead of just using a flat color, the area outside the mask is replaced with the next mip map in the chain, mip1, which uses only half the resolution. Then the process is repeated inside this area, but this time using the mip1 of the mask and filling the unused area with mip2. This process is repeated until the last mip.
As a result, the texture only contains as much detail as is actually needed when used in the game, but can be compressed much more effectively. By the way, I’m talking about the compression used to store the textures on disk, not the compression used to store the textures in memory at runtime. The compression techniques used at this stage prioritize speed, not compression ratio.
Therefore, the algorithm is much simpler and the compression ratio is fixed and does not change depending on the texture content.
You can find a more detailed explanation of the algorithm in this article written by Sergi Carrion, who implemented Mip Flooding in Python. I strongly recommend that you read it before continuing with my article, as it inspired mine in many ways, and I’ll skip many details that he already covered.
Why Substance Designer?
Sergi Carrion’s Python implementation, available on GitHub, is already easy to use, and depending on your needs, it’s probably exactly what you need. The fact that it’s written in Python makes it versatile and usable in many contexts. Still, most artists I know don’t like to introduce new tools into their workflow, preferring to use the tools they already know. And as luck would have it, Substance Designer, a software that is very popular among texture artists, has all the features needed to implement mip flooding without any additional tools.
The Implementation
In the following paragraphs, I’ll cover the implementation and explain how it works. I’m assuming that you’re already familiar with Substance Designer, so I won’t go into detail for each step, but I’ll try to be as concise as possible without being cryptic.
Note
After I originally published this post, Jan Ortgies contacted me and pointed out a problem with the original implementation that caused colors from outside the masked area to bleed into the result. To fix this problem, the pixels of the mips have to be weighted with the mask. For a more detailed explanation, take a look at his pull request for Carrion’s implementation.
He also changed the way the mask is used, treating it as a binary, causing the original edge colors to be spread out further. So I edited the article to include his improvements. I also recommend that you check out his C++ implementation, which may be a better fit for you, depending on your pipeline.
The Flood Layer
Mip flooding is basically repeating the same step along the entire mip chain, so the first step is to create a graph that performs the step that needs to be performed multiple times later. I called it the flood layer and it looks like this:
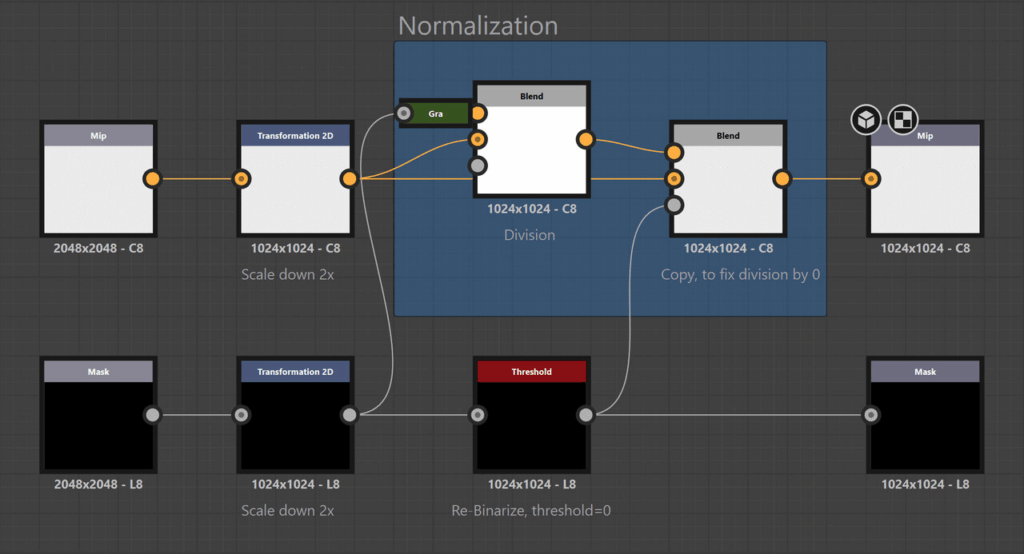
This graph does several things:
- It scales the inputs down to the size of the next mip.
- The mask is thresholded so that every value above 0 is set to 1. This makes sure the high-res mips extend further outside of the shell and preserves the edge colors better
- The downscaled mip is then divided by the mask to normalize the mip again. Before any of the nodes in the flood layer are used, the original image is multiplied by the mask, so the pixels at the edge are darker. Dividing each mip by the mipped mask fixes this and ensures that colors from outside the masked area don’t affect the result. Since dividing by 0 in the areas outside the mask produces only pure white, the thresholded mask is used to layer the original mip in these areas.
The Composite Graph

The generated mips need to be composited together again. This is as simple as it seems, the only reason this is in a separate graph is that the previous mip needs to be upscaled using the nearest neighbor method, that’s why this separate graph exists.
The Flood Chain
Once the flood layer graph and the composite graph are ready, a third graph can be set up:
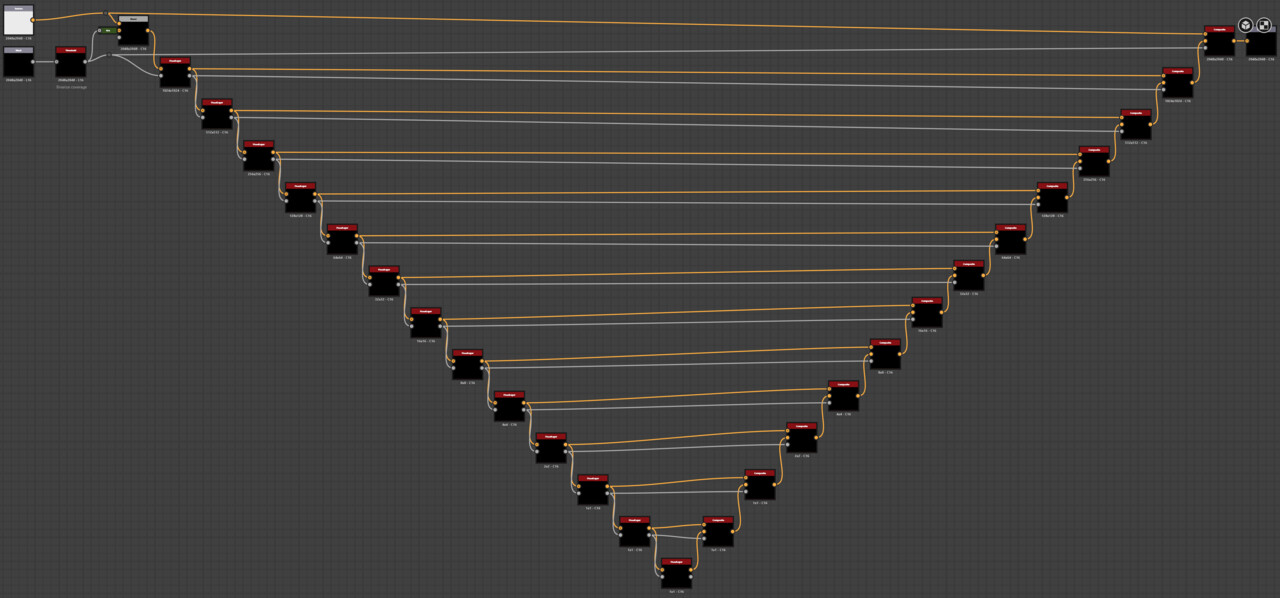
This graph is as repetitive as it looks. For each mip, the flood layer node scales down the previous mip, and the mips are then combined in the composite map node. There are two steps before the layering: The mask is thresholded before the first loop, just like the mipped masks. And the original texture is multiplied by the mask. While this leaves the areas outside the mask black, these black areas won’t be visible in the final result as long as all the mips are created and composited, and it prevents pixels from outside the masked area from bleeding into the final result.
Note: If you’re like me, you’re already wondering about the fixed number of layers, and you’re right: Ideally, the number of layers should be equal to the number of mips. A 2048px texture should use 11 layers, a 512px texture should use 9 layers, and so on. This behavior could be implemented using switch nodes with function graphs to use only as many layers as needed.
I didn’t implement this because using too many layers only increases the execution time but doesn’t change the results. If you work with 8k textures, you may want to add another layer (and wonder what you actually need 8k textures for).
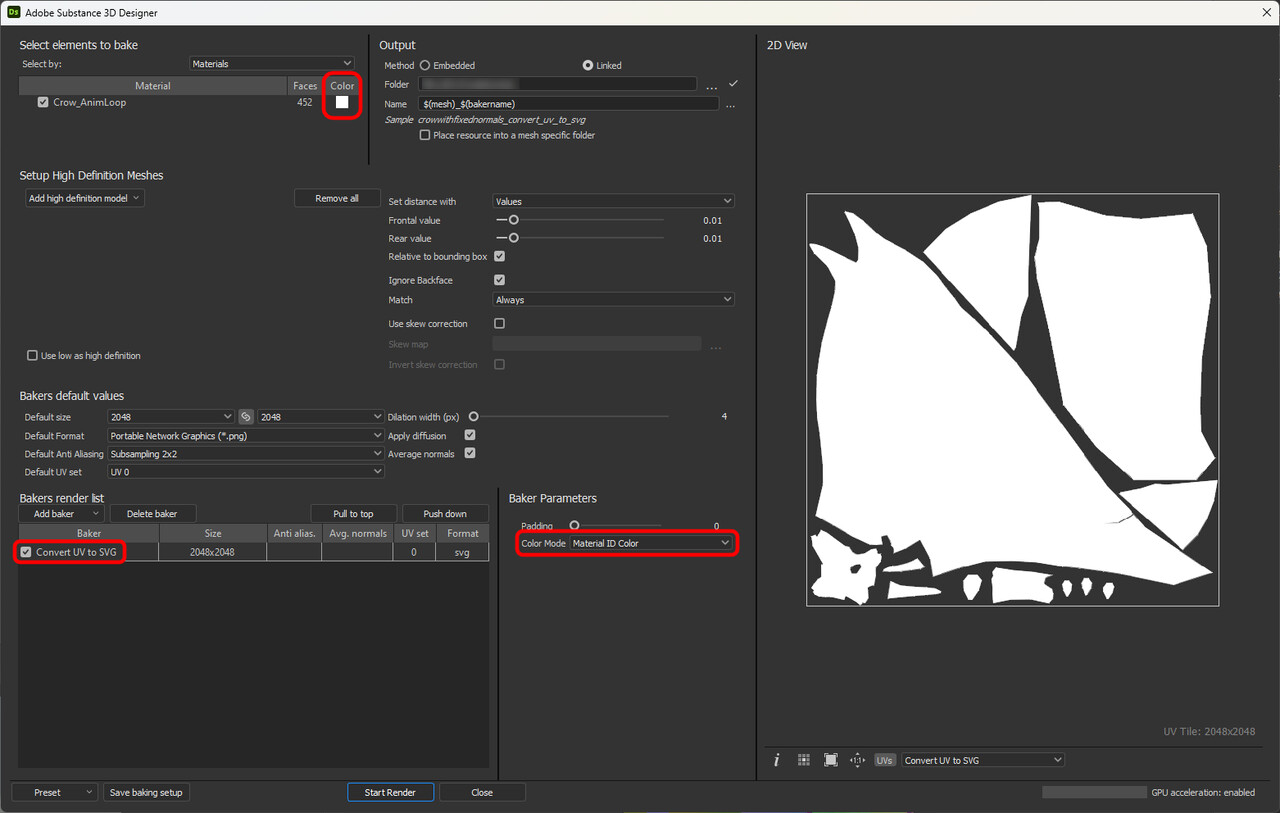
Creating the Mask
Now that the mip flooding graph exists, it can be used to optimize any texture, as long as a mask is provided. To create the mask based on the UV shells of a mesh, you can use the Convert UV to SVG baking tool:
Testing the Results
To test the implementation, I used a rock mesh from Unreal’s Lyra sample content. In the screenshot below you can see the texture before and after the mip flooding was applied:
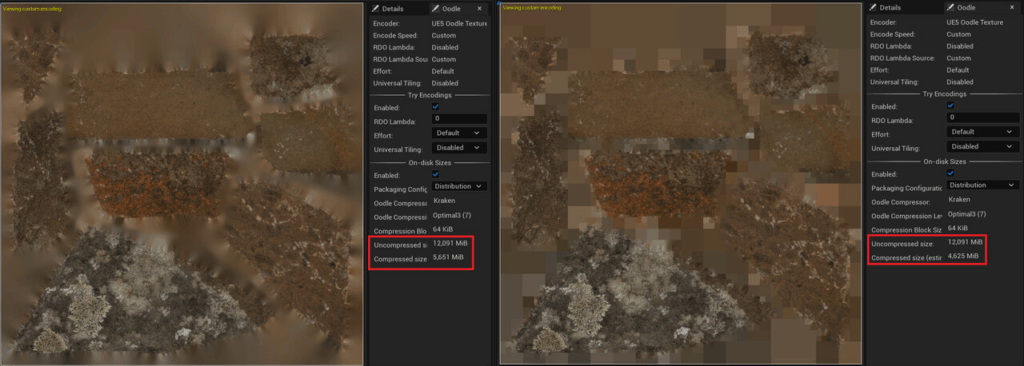
Although the mesh uses a very efficient layout, the texture size is reduced from 4.65 to 4 MB (-14%). Not bad for a technique that only requires a few clicks per mesh to make it work and doesn’t degrade the visual quality of your game in any way.
Next Steps
Mip flooding can be used for almost any texture in your project, the only cases where you probably won’t want to use it are tiling textures or UI textures. So the next step is to automate the process. Substance has an automation toolkit that can be used for this, but that is a topic for another article.
I hope you learned something from this article, or at least enjoyed it. If you did, please share it with others! If you have any comments, questions, or feedback, please post them below. To get new posts, follow me on Artstation.
Note: In a previous version of this post, I used the tile sampler to achieve nearest neighbor filtering because I didn’t realize there was an option in the transform node to set the filtering method. Thanks to David Peryman for pointing this out.