If you’re familiar with UI design, you’re probably familiar with how 9-sliced sprites work:
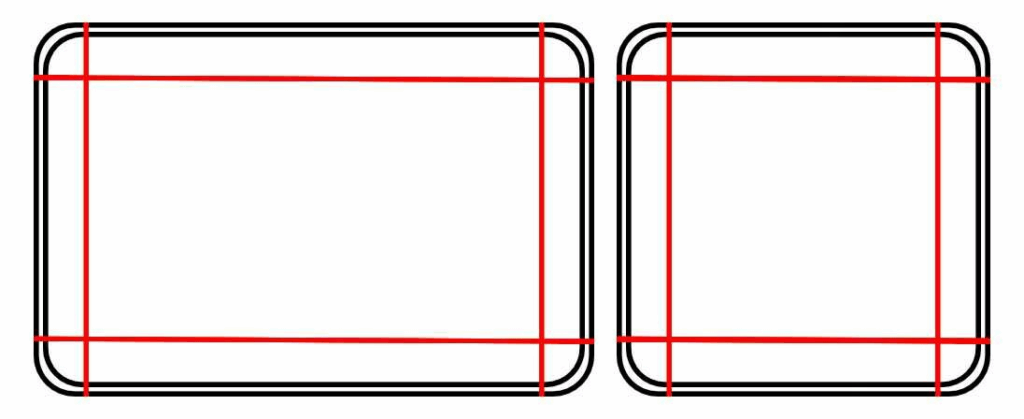
It’s a technique that allows you to scale UI elements to any size by scaling only the middle part of the sprite, which usually doesn’t contain any details that would show noticeable stretching. The edges are only scaled by 1 dimension each, and the corners don’t change size at all.
This technique has been a staple of UI design for years, and as someone who spends more time working with 3D assets, it was always something I envied.
Especially when creating levels for games, the ability to freely scale 3D meshes without worrying about the stretching being noticeable can be incredibly helpful, as you can now better tailor meshes to the needs of the gameplay. And since I couldn’t really see any reason why it shouldn’t work in 3d, I implemented a 9-slice system in an Unreal material. Well, a 27-slice system to be exact.
So here it is, a breakdown of how the material works and how you can recreate it for your own projects:
The Material Function
It took me some time to figure this out, but in the end it’s not all that complex. The screenshot below shows the material function that calculates the WPO output of the material:

There are two steps needed to make this work:
- Calculating the offsets to move the vertices so that they remain in position relative to the outer edges of the mesh’s bounds
- Creating a mask that controls whether the offset is used. The object is stretched only in the areas outside the mask.
Calculating the Offset
First, the distance between the current vertex and the edge of the boundary is calculated (as a vector, since the distance is needed for each dimension). Since this distance is always positive, it is then multiplied by the sign of the local position, so that the offset vector points in the right direction.
The next step is probably the least intuitive: The vector is multiplied by the object scale -1 and then divided by the object scale.
But it makes sense: By multiplying it by the object scale – 1, the offset is scaled to 0 when the object scale is set to 1, since no deformation is needed in this situation. But at the same time, this multiplication causes the offset to be scaled according to the object scale. Since the vector is later transformed from local space to world space, the scale is applied twice, so the vector must be divided by the scale.
The last step before the transformation into world space is the multiplication with the mask.
Calculating the Mask
This is the easier part. To create the mask, the local position is divided by half the size of the bounds. This creates a gradient (for each dimension separately) that goes from 0 at the center to 1 at the edges of the local bounds. Actually, it’s -1 for the part of the mesh that goes in the negative direction, so the Abs function is needed to make the result symmetrical. This gradient is then used as input for an inverse lerp. This function returns a value between 0 and 1, depending on where the input value is between the A and B values. For values outside the A-B range, the values can be higher or lower, so the result must be saturated.
The result of the function can then be plugged into the material’s WPO output pin. By adjusting the stretched area size and softness, you can control where the stretching should occur for each material instance.
Limitations/Requirements
For this technique to work properly, the meshes need to meet several requirements:
1. The mesh needs to be created in its smallest possible state and then scaled up as needed. Scaling objects smaller than 1.0 can cause problems because vertices that maintain their original distance from the boundary edges can overlap with vertices on the other side of the mesh or even cut through the other end of the mesh.
2. For best results, the meshes should have a fairly empty area in their center along the scale axis where the stretching can occur without being too noticeable.
3. As with any vertex shader, the topology of your mesh becomes relevant, so when creating meshes to be used with this technique, keep this in mind and add edge loops where needed.
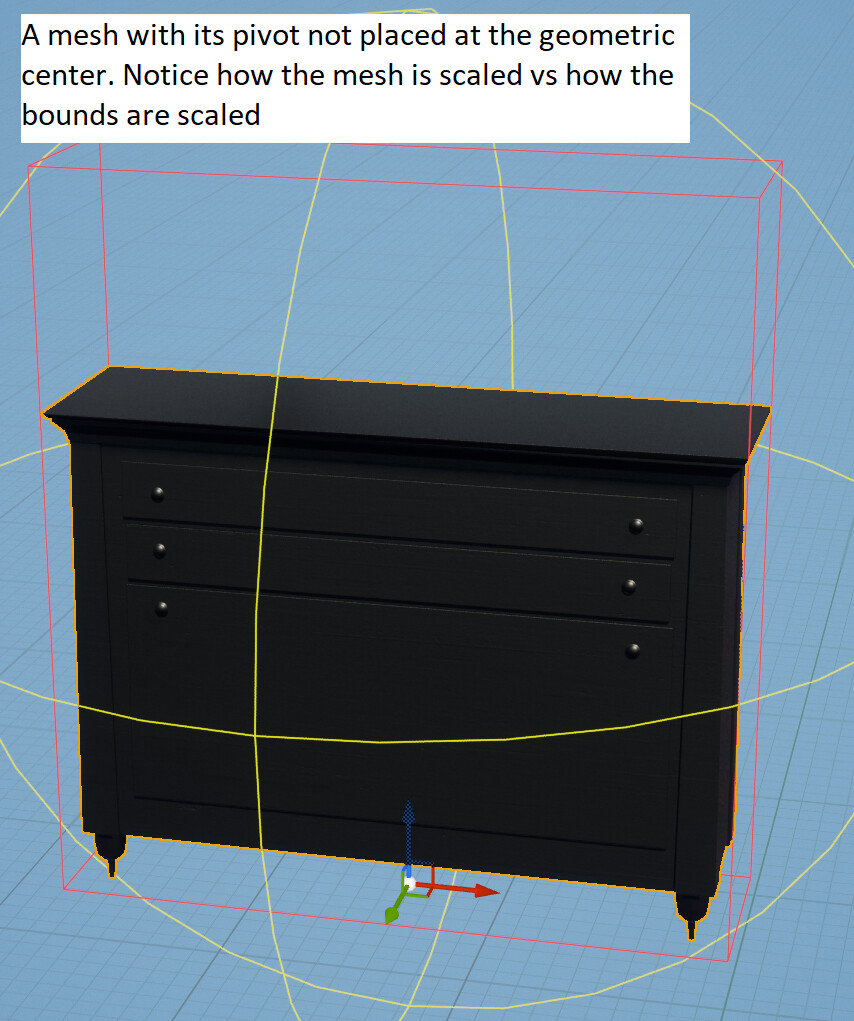
4. The shader assumes that the pivot point is at the geometric center of the mesh/bounds. If the pivot point is somewhere else, the scaled object will not always scale correctly.
5. This shader will not work with ISMs or HISMs because the individual instances do not have their own bounds calculated.
All of these limitations can be overcome with some modifications, but for this tutorial I wanted to stick to a basic approach.
Textures
While it’s not the focus of this tutorial, I recommend using triplanar mapping for the textures if possible to avoid obvious stretching. Be aware, however, that Unreal’s WorldAlignedTexture material function is a very expensive implementation, since the texture has to be sampled three times. I’d rather recommend using biplanar mapping or, even cheaper, rendering triplanar UVs to sample the texture just once. There are a lot of great resources on both techniques, so I won’t go into detail here.
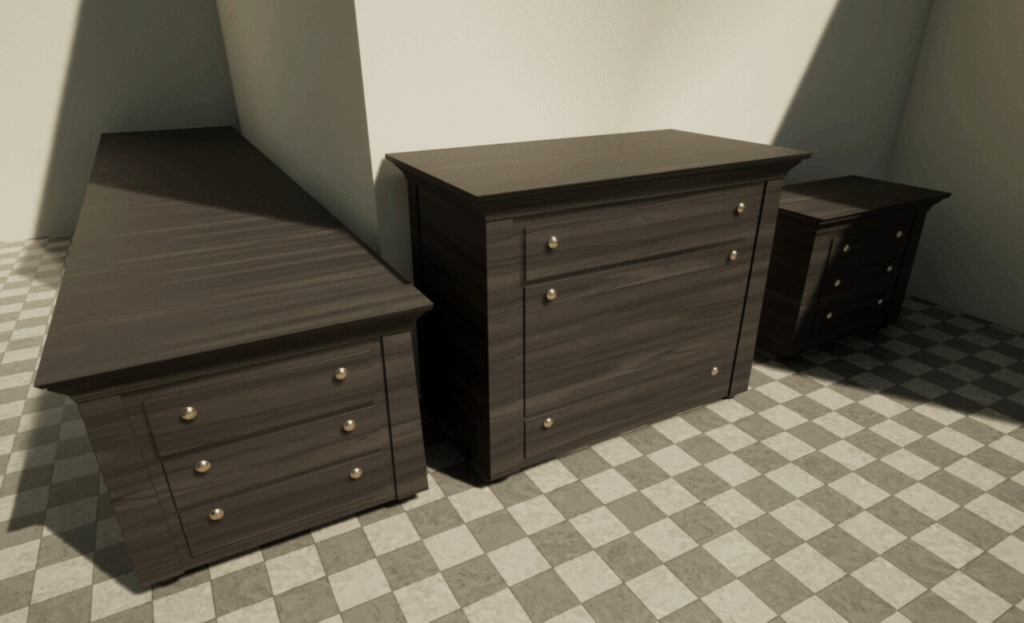
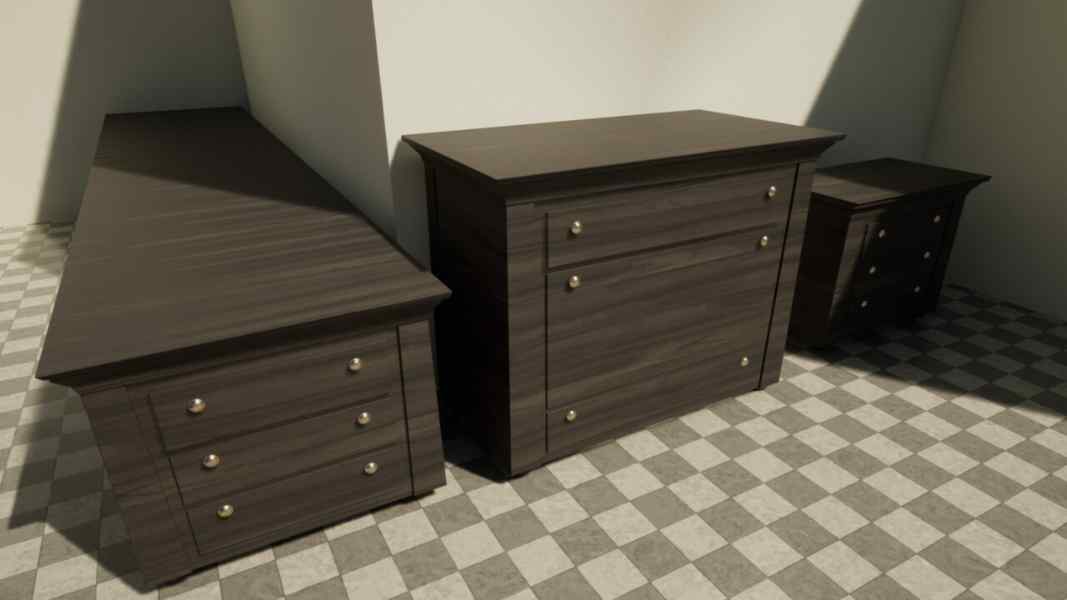
Results
And finally, the result of all these efforts: Furniture that can be scaled to any size without noticeable stretching: